So if there is one thing I love more than sketching, it’s stationary. However, the biggest problem I recently faced was that none of the sketchbooks I owned could handle alcohol based markers.
For the new year, I’d recently bound my own diary from fully recycled materials, so using this knowledge, I figured I’d create my own sketchbook using paper I knew could handle ink heavy markers.
So what will you need?!
- Spray Adhesive
- Spool of cotton
- Needle
- Steel rule
- Paper for pages of sketchbook
- Cardboard (preferably non-corrugated)
- PVA glue
- Cotton fabric
- Pen
- Cutting knife (scissors also work, but a knife is better)
Things needed which aren’t shown:
- Scrap book paper for cover page of book
- Bull dog clips
- Grease Proof paper
Start by deciding how many pages you want in your book. It’s best that the number of pages is a multiple of 6, 7 or 8 as you will be creating book signatures (the sections which make up the books) that each have this many pages.
In the book I was making, I chose to use 42 sheets made from 7 signatures, each with 6 pages. I recommend 6, 7 or 8 pages for each signature as over that, it will be harder for all your pages to align nicely.
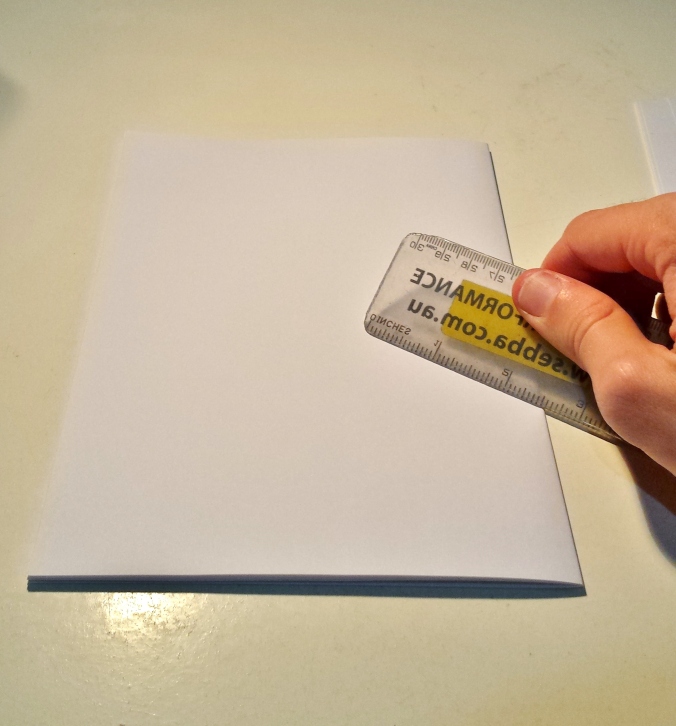
Fold each stack of pages in half to form the signature. Run something with a solid edge down the fold of the signature to give it a crisp edge. This will help in keeping your book as compact as possible at the end.
Once you have folded all of your signatures, you will need to mark where the stitches will go. To ensure that the holes were all consistently marked, I clamped the signatures together with a bulldog clip on either side. The paper sandwiched between the signatures and clip is to reduce the chance of the clip marking the paper.
For the first hole, I measured 1.5cm from the end, then alternated between 5cm and 1.5cm marks for the remaining holes.
After marking, it is best to not change the order of the signatures from here on in.
Now that you have marked where each hole will be going, open the signature and pierce through all the pages using something sharp like a thumbtack or needle. Repeat this for all holes in each signature; again, ensuring the order of signatures does not change.
Measure a piece of cotton that will be long enough to span the length of the number of signatures you have created. Depending on the thickness of the cotton, you may need to double it over, in which case, just double the length you have just measured.
Tie a large knot at the end of the cotton that will be big enough to stop it from going through the end hole you have pierced.
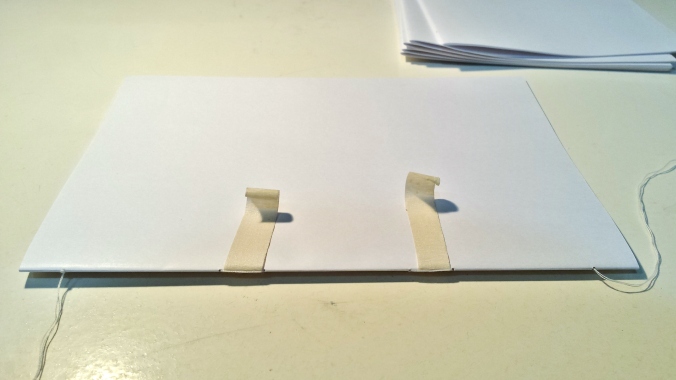
With the bottom signature, cut two piece of masking tape or medical tape that will fit between the 1.5cm gaps in internal holes.
The first two signatures are as easy as it gets; just stitch in and out of the holes, making sure to go over the tape. When you get to the end of the first signature, just place the second on top and stitch back the other way.
Once you get to the end of stitching the second signature, you need to secure it to the first. This is simply done by looping the free cotton around the knot and pulling it back tight. From this point, continue stitching on the third signature.
After you get to the end of the third signature, secure it to the rest of the text block by threading the needle between the previous connecting stitches. This is easier seen in the picture above.
Continue this process until you’ve sewn together all of your signatures. Cut off the excess cotton, leaving about an inch left over. Tape this tail down to the front page of the page to secure it. Now you’ve just about completed your text block!
To finish the text block, a piece of fabric will be used to reinforce the spine. To do this, firstly, measure out a piece of material the length of the text block and few inches in width.
Using PVA glue, thoroughly cover the spine, levelling out all of the dents between signatures.
Finally, lay the piece of fabric over the spine, press it on firmly and flip the book over onto its spine to dry.
While the text block is drying, it is time to start working on the covers.
Firstly, on the card board sheets, measure out the cover to 10mm taller than the length of your pages (5mm on top and bottom), and 5mm wider.
Once you’ve cut the first cover, it’s just as easy to use this as a template for the second, rather than measuring it all out again.
For the spine section of the cover, measure the widest part of the spine of your text block and use this as the width for the cardboard. Again, the length of this piece will be 10mm longer the length of the paper you used in your text block.
Lay the cardboard pieces out, leaving a gap between the spine section and the other two covers. This gap should be about the thickness of the cardboard. This will allow the book to close properly.
Once everything is laid out properly, place two pieces of tape on what will be the back to keep everything together.
Now it’s all starting to come together!
Using the material that will cover your book, measure and cut a rectangle that is an inch or two longer than the overall dimensions of the cardboard.
With the spray adhesive, give the back of the cardboard a good coat. Carefully place the cardboard back onto the material and press the two together firmly. Leave the cover now until the glue has become touch dry.
After the cover has dried for around an hour, place a glob of PVA in each of the corners of the cardboard.
Pull the corners of the fabric tight over the PVA and press flat.
Following this, squeeze out PVA along the length of the cover and fold the fabric tight over the edge. Repeat this for the other three sides.
As you can see, I used a piece of left over cardboard to help make sure the fabric was going down flat. I also found that this helped with spreading the glue under the material.
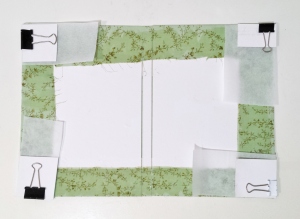
Also to keep the corners of the book flat whilst drying, a good trick is to sandwich the corners between grease proof paper and a square of cardboard. This distributes the pressure of the clip over the whole corner and the grease proof paper means no peeling of cardboard off dried glue
(Forgot the grease proof paper on my first book; that was fun…)
Time to glue the text block to the cover. Spread some glue down either side of the spine section on the cover, however, make sure not to get any on the actual spine.
Firstly, trim the corners of the fabric on the text block to be at 45 degree angles (this just helps in keeping it looking neater). Now, press these flaps firmly over the glue you just spread out.
Definitely ensure that these flaps are glued down well as this is what will be holding your book together.
Place a layer of grease proof paper on either side of the text block and weigh down those flaps with a whole bunch of books!
The last thing to do while the text block is being glued, is to make the cover pages. Using two square of scrap booking paper, measure out two rectangles the same size as the paper you were using in your book.
Cut these rectangles to size and score them down the centre so that they will easily fit in the front and back covers.
Lastly, once the glue for the text block has finished drying, spray the back of each piece of scrap book paper with the spray adhesive. Then, carefully lay the pieces in front and back covers of the book. Don’t worry if the alignment isn’t perfect, just trim any excess scrap book paper away once the sketchbook has finished drying.
With the gluing finished, all that is left to do now is squash the book flat overnight!
And that’s it; your new sketchbook is completely finished! Now go show it off to your friends and brag about your expert craftsmanship in book binding. Most of all though, start filling it up with your new sketches.


loved the details and all the pictures make it easy to follow. thanks!
LikeLike
Glad you enjoyed it. It was tough to remember take all the photos and not get carried away with just making it!
LikeLike
Love the details and photographs! Could I ask how long the whole process took though, the efforts + waiting time.
LikeLike
Hi Min, thanks for that. All up I think I did it for a couple of hours over three nights. First night I made the text block and cover, let them both dry over night. Second night I glued the block into the cover (let it dry over night again) and prepared the scrapbook paper for the inside covers. Third night glued the inside covers in and pressed everything flat over night.
If you have everything prepared by the night before, you could glue and leave it at night, then glue the next part in the morning and it’ll be good to work woth by that night again.
LikeLike
I love the fabrics you used, your results are so much cleaner than when I first tried making my hand at binding.
LikeLike
This is great! I am excited to try this. Great tutorial, thanks!
LikeLike
I love binding books too. I’ve learnt some new improved methods from your post, so thanks!
LikeLike